
Materials and Tools Needed for Fabric Painting
Fabric paint types and recommendations
Embarking on the creative journey of how to fabric paint a shirt requires more than just a splash of colour and a dash of enthusiasm; it demands the right materials and tools to elevate your design from amateur doodle to wearable art. Interestingly, choosing the appropriate fabric paint can make or break your masterpiece, as not all paints are created equal—some are designed for cotton, others for polyester, and a few boast versatility across both. The key lies in selecting fabric paint types that adhere well without cracking or peeling, ensuring your artistic expression withstands the rigours of everyday wear.
Essentially, you’ll need an array of tools to bring your vision to life. From fine brushes for intricate detailing to sponges for bold backgrounds, each plays a vital role. For those seeking precision, fabric markers can be an invaluable addition. When it comes to fabric paint recommendations, opt for brands renowned for their durability and vibrant pigmentation, such as Pebeo or Jacquard. An understanding of these subtle differences can significantly enhance your success when exploring how to fabric paint a shirt with professional finesse.
Essential brushes and tools
Mastering the art of how to fabric paint a shirt hinges on the meticulous selection of materials and tools that transform a blank canvas into a vibrant expression of personality. The right brushes aren’t merely tools—they are extensions of your creative intent, allowing for both delicate detail and sweeping coverage. Fine-tipped brushes excel at intricate patterns, while broader, flat brushes are perfect for bold, sweeping backgrounds. Equally vital are sponges, which lend texture and depth, creating layers of visual intrigue that elevate your design beyond the amateurish.
For those seeking precision, fabric markers prove invaluable, offering control and consistency in fine lines and lettering. When choosing tools, consider the texture of your fabric; softer brushes glide more smoothly over cotton, whereas stiffer brushes can add a gritty, textured effect suitable for certain artistic visions. To streamline your process, a palette of essential tools might include:
- Varied paintbrushes (fine, flat, and fan shapes)
- Fabric markers for detailing
- Sponges for background blending
- Palette knives for mixing colours
- Protective sheets and masking tape to safeguard areas
Investing in quality tools ensures your fabric paint adheres seamlessly, resisting cracks and peeling—crucial factors when considering how to fabric paint a shirt with lasting vibrancy and finesse. The harmony between your chosen tools and fabric paint sets the foundation for artistic brilliance that commands attention and withstands the test of time.
Additional supplies (stencils, chalk, etc.)
Creating a masterpiece on fabric requires more than just brushes and paint; it demands a carefully curated selection of materials and supplementary supplies that elevate your craft to an art form. When exploring how to fabric paint a shirt, every element, from stencils to chalk, plays a vital role in shaping the final vision. These additional tools serve as silent guides, helping you translate your ideas into tangible beauty with precision and finesse.
Stencils, for instance, are invaluable for achieving intricate patterns or lettering that might otherwise be elusive without a steady hand. Chalk, on the other hand, acts as a temporary marker—simple but essential—to sketch your design directly onto the fabric before the first brushstroke. This step ensures your artwork remains aligned and proportionate, avoiding any unwanted surprises during the painting process.
- Stencils – for consistent, detailed motifs
- Chalk – for outlining and planning your design
- Sponges – for blending colours and adding texture
- Masking tape – to protect areas of the fabric from unwanted paint
- Protective sheets – to safeguard your workspace from stains
Incorporating these additional supplies into your toolkit transforms a simple shirt into a canvas of limitless possibility. They empower you to express your unique vision with clarity, ensuring that every line, shadow, and hue harmonises perfectly. Mastering the nuances of these materials is essential when learning how to fabric paint a shirt, turning an ordinary garment into an extraordinary work of wearable art.
Preparation essentials (protective coverings, water, etc.)
Embarking on the journey of fabric painting transforms a simple shirt into a wearable masterpiece, but the real magic begins with the right preparation. Ensuring your workspace is properly protected sets the stage for a smooth creative process. Protective coverings such as plastic sheets or old newspapers act as a barrier against accidental splashes, making cleanup a breeze and safeguarding your surfaces from stains. A steady supply of water is essential, not only for cleaning brushes but also for diluting paints to achieve desired effects. When learning how to fabric paint a shirt, these seemingly humble materials become vital allies in your artistic adventure.
Equipping yourself with the proper supplies enhances control and precision, turning a casual project into a professional-grade craft. A well-organised toolkit might include:
- Protective coverings to shield your workspace
- Clean water for rinsing brushes and thinning paints
- Paper towels or rags for quick cleanup
- Palette or mixing tray for colour blending
Every element, from the protective layers to the water for rinsing, plays a crucial role in your fabric painting journey. They create an environment where your creativity can flourish without worry, allowing you to focus solely on the wonder of transforming a blank shirt into a statement of art and personality.
Preparing Your Shirt for Fabric Painting
Choosing the right shirt fabric and color
Choosing the right shirt fabric and colour is a vital step in mastering how to fabric paint a shirt. The fabric’s texture and composition can dramatically influence the vibrancy and longevity of your design. Natural fibres like cotton and linen tend to absorb fabric paint more evenly, resulting in richer colours and sharper details. Conversely, synthetic fabrics such as polyester may require specialised paints or additional preparation to achieve optimal results.
Opting for a plain, mid-tone colour as your base provides a perfect canvas. Bright white shirts can make colours pop, while darker hues offer a more subdued, artistic effect. If you’re aiming for a bold statement, consider selecting a shirt with a smooth, tightly woven surface—this minimises bleeding and ensures your artwork stays crisp.
When preparing your shirt, always bear in mind that fabric choice shapes your entire creative process. For those keen to learn how to fabric paint a shirt that truly stands out, attention to fabric and colour selection is the crucial first step—setting the scene for a masterpiece in the making.
Pre-washing and drying the shirt
Understanding the importance of preparing your shirt properly can make all the difference in achieving a professional finish when learning how to fabric paint a shirt. Pre-washing your garment is a crucial step—this process removes any sizing, chemicals, or residues that could interfere with paint adhesion. It’s a simple act, yet it lays the foundation for vibrant, durable artwork that withstands washing and time.
Once washed, drying the shirt thoroughly is equally essential. Damp fabric can cause paint to bleed or spread unexpectedly, ruining your carefully planned design. To ensure optimal results, opt for air drying or tumble drying on a low setting, avoiding any fabric softeners or harsh detergents that might affect paint adherence.
- Wash the shirt in a gentle cycle with mild detergent.
- Ensure it is completely dry before beginning your fabric painting project.
Taking these preparatory measures transforms your plain shirt into a flawless canvas, setting the stage for your creative expression to truly shine. Such meticulous preparation underscores the artistry involved in how to fabric paint a shirt, elevating it from a simple craft to a refined craftwork.
Ironing and smoothing the fabric
Before unleashing your artistic vision upon a blank canvas, the fabric must be tamed and prepared—like a dark ritual awaiting its incantation. Ironing the shirt meticulously smooths away wrinkles and creases, transforming the fabric into a pristine surface that welcomes your fabric paint with open arms. A wrinkled surface can distort your design, causing unintended shadows and uneven strokes, so patience at this stage is vital.
Once pressed, take a moment to examine the fabric’s surface. If necessary, use a soft cloth or pressing cloth to shield delicate areas, ensuring no scorch marks mar the material. For a seamless application, consider the following steps:
- Lay the shirt flat on an even surface, free from dust or debris.
- Use a hot iron on the appropriate setting for the fabric type, applying gentle pressure.
- Address any stubborn wrinkles with a second pass, ensuring the fabric lies perfectly smooth.
With the fabric now a sleek, unblemished surface, your journey into how to fabric paint a shirt can truly begin. Smoothing and ironing are not mere chores—they are the silent heralds of your creative mastery, whispering that the stage is set for your artistic opus to come alive.
Design planning and sketching tips
Once your shirt is perfectly prepared—smooth, clean, and ready—it’s time to breathe life into your design with careful planning and sketching. This phase is often underestimated but holds the key to transforming a blank canvas into a wearable piece of art. Thoughtful preparation in your design process can make all the difference between a chaotic mess and a cohesive masterpiece.
Begin by visualising your concept, considering how the chosen fabric colour and texture will interact with your design. Using a light pencil or chalk, sketch your ideas directly onto the fabric, allowing room for adjustments. For intricate patterns or detailed images, consider creating a template or stencil to maintain precision. Remember, the goal is to translate your artistic vision seamlessly onto the fabric—so patience here is essential.
To streamline your creative flow, some artists prefer to plan their design in stages, perhaps starting with rough outlines before refining details. Whether you opt for freehand drawing or structured stencilling, having a clear plan boosts confidence and ensures your finished piece accurately reflects your initial inspiration.
Design Techniques for Fabric Painting
Freehand painting vs. stenciling
When exploring how to fabric paint a shirt, understanding the nuances of design techniques can elevate your creation from simple to stunning. Freehand painting offers an organic, spontaneous feel—perfect for artists who crave control and want to infuse personality directly onto the fabric. It allows your imagination to flow freely, with brushstrokes capturing movement and emotion in real time. Conversely, stenciling provides precision and repeatability, making it ideal for intricate patterns or consistent motifs. Using stencils can transform a blank canvas into a professional-looking masterpiece with clean edges and sharp details.
- Freehand painting lends itself to expressive, one-of-a-kind designs that showcase your artistic flair.
- Stenciling simplifies complex designs, ensuring uniformity across multiple shirts or sections.
Deciding between these techniques depends on your project’s complexity and the style you desire. With either method, mastering the basics of how to fabric paint a shirt opens up endless creative possibilities, blending artistry with personal expression.”
Creating outlines and fills
Mastering the art of how to fabric paint a shirt involves more than just choosing colours and brushes; it’s about creating harmonious outlines and fills that bring your design to life. When working on your fabric paint project, consider starting with a clear outline—this serves as the blueprint for your entire design. Using fabric-safe markers or a light hand with a chalk pencil can help you sketch your ideas precisely. Once the outline is complete, filling in the spaces with carefully chosen fabric paints adds depth and vibrancy.
To achieve a professional finish, some artists prefer to layer colours gradually, allowing each layer to dry before adding the next. This technique prevents smudging and preserves the integrity of your design. For intricate patterns or uniform repeats, stencilling can be particularly effective, offering sharp, consistent fills that elevate your shirt from handmade to masterpiece. Remember, the key to mastering how to fabric paint a shirt is patience—each step in the process contributes to the overall artistry and durability of your creation.
Using sponges and stamps for texture
Texture adds a captivating dimension to fabric painting, transforming a simple shirt into a wearable work of art. Using sponges and stamps is an inventive way to achieve this, offering a tactile richness that brushes alone can’t deliver. When exploring how to fabric paint a shirt, integrating textured techniques allows for a dynamic visual impact—think of a soft, mottled background or bold, repetitive patterns that catch the eye.
Sponges are incredibly versatile. Dabbing or stippling with a sea sponge can create subtle gradients or organic patterns, while foam brushes offer controlled application for more defined textures. Stamps, whether carved from rubber or purchased as pre-made motifs, enable you to produce consistent, intricate designs with ease. For example, a floral stamp can be repeatedly pressed across the fabric, creating a cohesive pattern that elevates your shirt’s aesthetic.
To enhance your design further, consider layering textures.
- Start with a sponge dabbed in light fabric paint for a delicate background
- Use stamps for focal points or motifs
- Finish with a contrasting sponge technique for depth
This layered approach brings complexity and vibrancy, making your shirt truly unique. The key is patience and experimentation—each technique unlocks new creative possibilities in your fabric painting journey, guiding you on how to fabric paint a shirt with stunning textured effects.
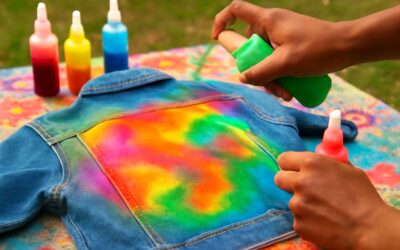
Incorporating multiple colors
Layering multiple colours in fabric painting transforms a simple shirt into a vibrant masterpiece. The secret to achieving dynamic depth lies in understanding how to fabric paint a shirt with colour. Start by applying a base hue, allowing it to dry thoroughly before adding contrasting or complementary shades. This technique creates a rich, multi-dimensional effect that draws the eye and invites closer inspection.
To enhance the visual complexity, utilise colour blocking or gradient blending. Using sponges or stippling brushes, you can effortlessly transition from one colour to another, producing a seamless fade or bold contrast. For more intricate designs, consider using stencils or masks to isolate sections of the shirt, ensuring precise application of vivid colours. Remember, patience is key—building layers gradually prevents colours from bleeding and preserves clarity in your design.
- Apply the lightest colour first as a background.
- Add darker or contrasting shades in layers, allowing each to dry.
- Use a fine brush or sponge to blend colours for a smooth gradient.
By mastering these techniques, you unlock a world of creative possibilities for how to fabric paint a shirt, turning a blank canvas into wearable art bursting with colour and personality. The magic of multi-colour fabric painting is not just in the palette but in the artistry of layering and blending—an essential skill for any serious fabric painter.
Step-by-Step Guide to Painting Your Shirt
Setting up your workspace
Setting up your workspace for fabric painting is an essential step that can make or break your creative flow when learning how to fabric paint a shirt. Imagine transforming a cluttered corner into a dedicated studio — a space where inspiration flows freely and messes are contained. Clear a flat surface, ensuring ample room for your shirt and supplies, and lay down protective coverings to shield your furniture from accidental paint splashes. Good lighting is crucial; natural daylight or adjustable lamps will highlight the true colours and details of your design, preventing any surprises once the paint dries.
Having everything within arm’s reach — from brushes and sponges to stencils and water jars — streamlines your process and keeps frustration at bay. If you’re planning multiple layers or colours, consider organising your supplies in small containers or palettes. This careful setup not only fosters a smooth workflow but also encourages confidence in your ability to craft a stunning, personalised shirt through proper preparation on your journey of how to fabric paint a shirt.
Transferring your design onto the fabric
Transferring your design onto the fabric is a delicate dance, where precision and patience intertwine. Once your sketch is ready, imagine the design as a whisper waiting to be heard on the textile canvas. To begin, lightly trace your outline onto the shirt using a fabric-safe chalk or water-soluble pencil. This gentle transfer ensures your design remains crisp and accurate, guiding your brush strokes with confidence.
For more intricate details, consider using stencils or a lightbox to project your design onto the fabric. If you’re feeling adventurous, freehand painting can bring a spontaneous, artistic energy to your creation. Remember, the key to mastering how to fabric paint a shirt lies in the careful transfer of your vision, setting a solid foundation for your artistic journey.
Applying fabric paint in layers
Mastering how to fabric paint a shirt is a colourful adventure that rewards patience and a splash of artistic flair. Once your design is transferred onto the fabric, it’s time to build up the colours in layers — think of it as giving your artwork a chance to breathe and develop depth. Applying fabric paint in thin, even coats ensures vibrant hues don’t bleed or pool, and allows each layer to dry thoroughly before adding the next. This layering technique not only prevents smudging but also enhances the overall durability of your masterpiece.
To keep your creation looking sharp, work from the background to the foreground, layering colours strategically. Consider using a dry brush to softly blend edges or add subtle shading. If your design calls for multiple colours, allow each layer to dry fully before proceeding — patience here is your best friend! For detailed elements, a fine-tipped brush will help you add intricate touches without overwhelming the design. Remember, the secret to how to fabric paint a shirt lies in patience, layering, and a steady hand to transform your sketch into a wearable piece of art.
Drying times and curing methods
Once your vibrant design is complete, understanding the importance of drying times and curing methods becomes pivotal in how to fabric paint a shirt. The drying process isn’t merely a pause; it’s a silent dialogue between your art and the fabric, allowing each layer to set with integrity. Typically, fabric paint requires at least 24 hours to dry naturally, but this can vary depending on thickness and environmental conditions. Patience here isn’t just virtue — it’s the foundation of durability and colour vibrancy.
To ensure your masterpiece withstands washing and wear, curing methods like heat-setting are essential. A common technique involves ironing the painted shirt on the reverse side or through a protective cloth, applying medium heat to lock the paint into the fibres. Alternatively, some artists prefer air-drying for 72 hours, especially when working with thicker layers or delicate fabrics. Remember, the key to how to fabric paint a shirt that lasts lies in both the patience of drying and the intentionality of curing techniques.
Incorporating a structured approach can be beneficial:
- Allow the paint to dry completely before handling or wearing.
- Use a heat press or iron to cure the paint if durability is a priority.
This ensures that every stroke remains vibrant, and the fabric’s integrity stays intact, transforming your creative endeavour into a wearable art piece that endures.
Tips and Tricks for a Professional Finish
Ensuring clean lines and details
Achieving crisp, professional lines in fabric painting can transform a simple shirt into a wearable masterpiece. Precision is key when learning how to fabric paint a shirt, and small adjustments can make all the difference. One often-overlooked tip is to steady your hand by anchoring your painting arm — a simple trick that ensures cleaner edges and sharper details. Using high-quality fine-tipped brushes allows you to navigate tight corners with ease, preventing accidental smudges. When working on intricate designs, consider employing masking tape or painter’s tape to create crisp borders and protect areas you want to keep untouched.
Another secret to a flawless finish lies in the way you approach layering and colour blending. Build your design gradually, allowing each layer to dry thoroughly before adding the next. This prevents bleeding and muddiness, which can ruin the clean look you desire. For added finesse, utilise tools like a damp sponge or a small stippling brush to soften edges or blend colours seamlessly. Whether you prefer freehand artistry or stencilling techniques, patience and a steady hand are essential in mastering how to fabric paint a shirt with professional results. Remember, the devil is in the detail, and these subtle tips will elevate your craft to new heights!
Avoiding common mistakes
Achieving a professional finish when learning how to fabric paint a shirt can be surprisingly straightforward with the right tips and tricks. One common mistake is rushing the layering process, which often causes colours to bleed or smudge. Patience is crucial—allow each layer to dry thoroughly before adding the next. This simple step ensures crisp lines and vibrant colours that stand out.
Another often-overlooked secret is maintaining a steady hand. Anchor your painting arm against the surface to minimise shakes and wobbles. Additionally, using high-quality fine-tipped brushes can make all the difference, especially when working on intricate details or narrow borders. For sharper edges, masking tape or painter’s tape is invaluable, providing crisp borders and protecting untouched areas.
- Build colours gradually, avoiding overloading your brush.
- Use tools like stippling brushes or damp sponges to blend edges smoothly.
- Keep your workspace organised to prevent accidental smudges.
By adopting these simple yet effective techniques, you’ll elevate your craft and master how to fabric paint a shirt with a polished, professional finish. The devil truly is in the detail, and a careful approach makes all the difference in creating wearable art that lasts.
Adding embellishments or finishing touches
Adding embellishments or finishing touches can elevate your fabric painting from amateurish to professional-quality. The key lies in subtle enhancements that don’t overpower your original design but rather complement it. For instance, a delicate touch of metallic fabric paint can add a shimmering highlight, while small hand-sewn beads or sequins can bring texture and visual interest to specific areas. When considering how to fabric paint a shirt, these finishing details are often what set a craft apart from true wearable art.
To refine your work further, consider using a fine-tipped fabric pen or a fabric-safe glitter gloss to add intricate accents, initials, or tiny decorative motifs. For a polished look, sometimes a light layer of fabric medium or glossy sealant over your painted design can help protect it against wear and tear. Remember, achieving a professional finish isn’t solely about initial application—it’s also about the thoughtful, strategic application of embellishments that enhance durability and aesthetic appeal.
- Assess your design and identify areas that might benefit from subtle embellishments or texture.
- Choose appropriate finishing materials that complement your colour scheme and fabric type.
- Apply embellishments carefully, ensuring they adhere well and do not distort your painted design.
- Allow all additions to dry completely before wearing or washing the shirt to prevent smudges or dislodging.
Ultimately, the secret to mastering how to fabric paint a shirt with a professional finish lies in these nuanced details. The careful selection and placement of finishing touches not only enhance visual appeal but also extend the garment’s lifespan, transforming your craft into a true piece of art.
Sealing and setting the fabric paint
In the shadowed hours of creation, sealing and setting your fabric paint can transform a fleeting vision into enduring artistry. A well-sealed design not only enhances durability but elevates the garment to a realm of wearable magnificence. When learning how to fabric paint a shirt, the final step often whispers the difference between a temporary masterpiece and a work of enduring beauty.
One of the most effective secrets is applying a clear fabric sealant or gloss once your paint has dried completely. This acts as a protective barrier against the relentless march of time and washing. For an even more professional touch, consider using a fabric medium mixed into your paints before application—this helps the colours meld seamlessly and resist cracking.
To ensure the longevity of your design, allow each layer of paint and embellishment to cure fully, following the manufacturer’s specified drying times. For added resilience, gently heat-set the paint with an iron, using a pressing cloth to shield your artwork from direct heat. Remember, patience is the silent partner in mastering how to fabric paint a shirt—every careful step preserves the integrity and beauty of your creation!
Care Instructions for Painted Shirts
Washing guidelines
When your masterpiece is finally dry and looking fabulous, the last thing you want is for your artistic flair to fade faster than a bad tattoo. Proper care instructions for painted shirts are essential to keep your design vibrant and intact. Washing guidelines for painted shirts should be approached with gentle reverence—think of it as a delicate dance rather than a wrestling match.
First, turn your shirt inside out—this simple step shields your artwork from the abrasiveness of laundry cycles. Use cold water and mild detergent; hot water can cause the fabric paint to crack or peel, transforming your art into a sad, peeling wallpaper. For optimal longevity, avoid tumble drying. Instead, hang your shirt to air dry, giving your paint job the time it needs to cure fully.
If you want your fabric paint masterpiece to stay on point, consider hand washing it carefully and avoiding harsh scrubbing or bleach. Following these washing guidelines for painted shirts ensures your visual triumph lasts wash after wash, and your friends remain envious of your DIY skills!
Drying tips
Once your masterpiece has dried to perfection, the journey to preserving its vibrancy begins—yet, it’s a delicate process that can make or break your artwork’s longevity. The secret to how to fabric paint a shirt that withstands the test of time lies in the drying and curing process. Proper drying isn’t just about patience; it’s about strategic care that ensures your colours stay bold and your design remains intact.
For the best results, allow your painted shirt to air dry in a well-ventilated space, away from direct sunlight. This slow, natural drying method helps the fabric paint cure evenly, reducing the risk of cracks or peeling. If you’re in a hurry, a fan set on a low setting can aid in gentle drying, but avoid exposing the shirt to heat sources like radiators or direct sunlight, which can cause the paint to blister or fade prematurely.
To prevent smudging or damaging your work, avoid hanging the shirt by the painted area until it is fully dry. Instead, lay it flat on a clean surface, perhaps with a piece of cardboard underneath to support the design. If you need to move it, do so with utmost care—any disturbance during the initial drying phase could compromise your carefully crafted design.
Long-term preservation
Long-term preservation of your painted shirt is an art as delicate as the design itself. Once your masterpiece has been carefully painted, the question lingers: how to fabric paint a shirt so it endures beyond fleeting moments of admiration? The secret lies in gentle, deliberate care—an unspoken ritual that guards the vibrancy against the ravages of time and wear.
To keep your artwork pristine, it’s essential to follow specific care instructions that respect the integrity of the fabric paint. After the initial drying, avoid harsh washing or vigorous scrubbing—these are enemies to your creation. Instead, opt for cold water washes and gentle, hand-washing techniques, which help preserve the vivid colours and fine details. When drying, always lay the shirt flat in a shaded, well-ventilated space to prevent colour fading from direct sunlight or heat exposure.
- Turn the shirt inside out before washing to shield the painted surface from friction.
- Use mild, phosphate-free detergents that will not strip the colour or break down the fabric paint’s bonds.
- Skip the dryer—air drying remains the safest bet for maintaining the longevity of your design.
Storing your painted shirt with care ensures it remains a haunting, wearable art piece through the ages. Fold it neatly, avoiding creases on the painted surface, and keep it in a cool, dry environment away from direct light. By respecting these long-term care principles, you discover how to fabric paint a shirt that not only captivates at first glance but continues to enchant over countless wears and washes—an enduring testament to your artistic devotion.
Troubleshooting Common Fabric Painting Issues
Paint cracking or peeling
Troubleshooting common fabric painting issues can feel like trying to tame a rebellious beast—especially when your paint decides to crack or peel faster than your patience. The culprit? Often, it’s a mismatch between the paint’s flexibility and the fabric’s natural movement. When fabric paint isn’t suited for the textile or isn’t properly set, it can become brittle and prone to cracking.
If you’re asking yourself how to fabric paint a shirt without ending up with a flaky mess, consider the following: First, ensure that the fabric paint you’re using is specifically designed for textiles, offering enough elasticity to survive wear and wash. Secondly, applying your paint in thin, even layers helps prevent cracking.
In some cases, a quick fix can be achieved by using a fabric medium—an additive that enhances flexibility—mixed into your paint before application. Remember, patience is key; giving the paint ample drying and curing time is essential to avoid peeling later down the line. Troubleshooting these issues might seem tedious, but mastering them ensures your shirt remains a wearable masterpiece rather than a cracked relic of artistic ambition.
Colors bleeding or fading
Troubleshooting common fabric painting issues can be as perplexing as deciphering a cryptic message. One of the most frustrating problems is colours bleeding or fading prematurely, turning your wearable masterpiece into a forgettable fade. The root cause often lies in the incompatibility of the fabric paint with the textile or insufficient preparation. When the paint isn’t designed to withstand washing or isn’t set correctly, colours tend to bleed into surrounding areas or gradually wash out.
To prevent this, it’s crucial to use high-quality fabric paint formulated for textiles. Incorporating a fabric medium can also bolster colour vibrancy and enhance durability. An often-overlooked step is ensuring your shirt fabric is fully prepped—clean, dry, and free of any residues that can cause paint to seep or fade.
- Test your colours on a hidden area of the shirt before committing to your design.
This simple step can save hours of regret later. When you learn how to fabric paint a shirt with care, your artwork will stay sharp, vibrant, and true to your vision, standing the test of time and washes.
Design smudging or uneven application
Nothing kills a creative vision faster than unexpected smudges or uneven application—those tiny imperfections that turn your masterpiece into a jagged mess. When learning how to fabric paint a shirt, precision is paramount, yet even seasoned artists stumble into these common pitfalls. The secret lies in controlling your application and understanding the movement of the fabric paint across the textile. A shaky hand or hurried strokes can cause colours to bleed or streak, ruining the overall effect.
One effective way to troubleshoot this issue is to work with deliberate, even strokes—taking your time to build up layers carefully. Using the right tools—such as fine brushes for details and sponges for backgrounds—can make a world of difference. For example,
- avoiding overloading brushes with paint
- keeping your workspace well-lit
- testing your colours on a scrap fabric before the main event
can help prevent uneven application. Remember, patience and preparation are your best allies in mastering how to fabric paint a shirt with flawless results that last through washes and wear.”

0 Comments